Setting The Time
There are only 4 buttons on this clock.
During normal RUN mode none of these buttons work, except for the recessed SET button.
Pressing this button, with the tip of a pen for instance, changes the clock from RUN to SET mode.
The clock is not running during SET mode.
The SET mode will not time out.
Thus the SET mode will be active until you press the RUN button again.
From that moment on the seconds counter will start counting from 0 again.
You can tell when the clock is in SET mode, because the colon between the hours and minutes has stopped blinking.
In SET mode the HOURS button will increment the hours counter every time you press it. And pressing the MINUTE button will increment the minute counter every time you press it. There will be no carry over from the minutes to the hours counter should the minute counter roll over from 59 to 00.
There is nu auto repeat rubbish in this clock.
Or auto repeat with increased speed when you hold the buttons down long enough.
Those are nice features which can easily be created with micro controller clock.
With a pure CMOS clock this is very hard to achieve.
I didn't bother about these features as I hardly ever have to use them anyway.
First Power On
This clock may behave a little strange when it is first powered up. But since that hardly ever happens, I din't bother fixing that behaviour and take it for granted.
The counters are not reset to a known state when the power is applied for the first time. Therefore the minutes counter could well be past 60 minutes. So you might see it start at 84 minutes for instance. Big deal, simply increment the minutes counter until it shows the right time.
The same can happen to the hours counter.
There it may be even worse because we only have 24 legal hours and a counter which can count to 99.
But not to worry, the hours counter is reset to 00 again whenever bit 2 and bit 5 of the hours counter are both 1 again.
What it makes it even more confusing is when IC3B decides that we're dealing with a leading 0, when the leading hour digit is not 0 at all.
IC3B powers up in one of its two states, and that might well be in the reset state.
This will blank the leading hour digit.
Not to worry, as soon as the MSD of the hours counter is advanced, the flip-flop will set, and everything will be fine again.
Calibrating The Time Base
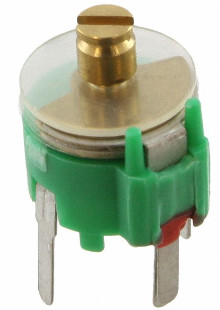
This one can be a bit tricky. There are several ways to do this. Calibrating the time base is done by carefully tweaking the setting of C5. A higher capacity will result in a lower frequency.

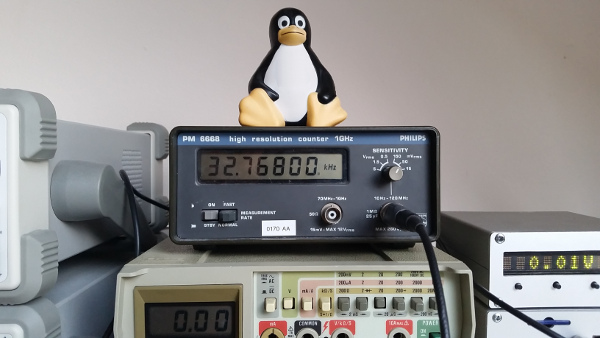
You'll get the quickest results when you have access to a high resolution frequency counter.
A normal frequency counter may help a bit, but a high resolution counter is better.
High resolution counters normally use the reciprocal counting method as opposed to fixed gate time counting.
You can tell whether you have a high resolution counter when it displays the frequency of 32768 in at least 7 digits, like 32768.00.
More digits are also possible, but that usually require a longer gate time.
Simply hook up your counter to TP1 and tweak C5 to make it show 32768.00Hz.
It is absolutely useless to set the gate time higher than 1 second to achieve even a greater resolution.
Seven digits is about as accurate as you can tweak your trimmer cap anyway.
Giving the trimmer cap a hardly noticeable twist will result in a change of 3 to 4 counts on the counter.
Another way of calibrating the time base is when you have access to an accurate signal generator.
Set this generator to output a signal of 32768Hz.
Use the signal from TP1 to trigger an oscilloscope (digital or analog) and connect the input of the scope to the output of the signal generator.
Now tweak C5 until the signal on the scope is neither going forward nor backwards.
If you don't have access to the required equipment it is going to be a test for your patience.
Simply start the clock and see if it is running fast or slow.
If it is running slow, decrease the capacity of C5 a bit.
If it is running fast, increase the capacity a bit.
Not too much, as we don't want to overshoot.
Then wait a few days again and see if it needs another tweak.
It all comes down to having the right tongue angle in order to get the time base calibrated.
Wearing a white coat and having a long grey beard may be helpfull too, at least according to some people..
How Accurate Is This Clock?
Well, that depends on your tuning skills and equipment.
Suppose we calibrate the clock with a 7 digit high resolution counter.
And due to the infinitely small steps you have to make with the trimmer cap you can't get it to show exactly 32768.00Hz, but you're one count off.
Suppose the counter reads 32768.01Hz instead.
What is now the error of the clock?
The frequency error is +0.01Hz, which means that every 100 seconds you have 1 pulse of the oscillator too many.
A total of 32768 pulses is equivalent to 1 second.
So every 32768 * 100 = 3276800 seconds the clock will be 1 second fast.
That is 1 second fast in about 38 days.
I can live with that.
You probably won't be able to make the clock more accurate than that because the resolution of the trimmer cap will not allow that.
Some Calibration Tips
I'll throw in a couple of calibration tips, for free! First of all, allow your instruments to warm up and stabilize before you are going to perform precision measurements. This is especially true for counters which have an oven controlled reference oscillator.
 At first I had used a 40pF trimmer cap, just as proposed by the data sheet of the 4060.
I noticed that the cap was set just slightly above the center value when the frequency was trimmed to the desired 32768Hz.
That means that the value of the variable capacitor was trimmed to about 22pF or there abouts.
So why not whack in a 30pF trimmer cap instead, to give me a slightly higher resolution?
That way it is slightly (not much) easier to get the frequency exactly right.
The maximum 30pF may not be enough in all situations.
This depends on the parts tolerances of course.
If you look at the average trimmer cap you'll notice that you can turn these things 360°.
That means that you can make the capacity increase when you turn the trimmer clockwise and you can make the capacity increase when you turn the trimmer counter clockwise.
Remember that the capacity increases when the two half moon parts of the capacitor overlap more.
Now do yourself a favour and make the frequency go up (less capacity on the trimmer cap) when you turn the trimmer cap clock wise.
This helps when you want to fine tune the clock in a couple of years.
Finally, get yourself a trimmer adjust tool, like the one in the picture below.
They contain less metal, which would influence the frequency whenever you touch the screw on the trimmer cap.
And the left side of the tool fits nicely around the screw so you won't have to worry about slipping off the srew while you are carefully tweaking the frequency.
And do not apply pressure on the trimmer cap's screw.
Pressure might press the plates a bit closer together, resulting in a higher capacity, which will change again once you remove the pressure.

And remember, tuning electronic circuits require a unique skill, it all comes down to getting your tongue angle just right!
I'm Impressed!
Not about my achievement in building this clock. No I'm impressed about the accuracy of the clock and my 35 years old frequency counter. 30 days ago I've synchronized my clock with a radio controlled clock, which is synchronized to an atomic clock. I'm absolutely confident that this radio controlled clock is accurate. And now, 35 days later my clock is still spot on. As we've seen above, one count off on the frequency counter would mean we can expect the clock to be 1 second off after 38 days. It's not 38 days yet, but my clock is still spot on in sync with the radio controlled clock. And I don't expect this will change very much in the next 8 days either.
So I'm impressed about the accuracy of my clock. But what's more is that this proves that my frequency counter is still accurate up until the last digit, after more than 30 years!
How do I know my counter is 35 years old?
While most of the ICs in the counter are from 1979, the youngest ones are from early 1980.
So presumably the counter is produced not a lot later than halfway 1980 or thereabouts.
But even if the counter was built 5 years later, it would still be 30 years old, which would make the accuracy of the counter today still quite impressive.
