Connect Your Raspberry Pi To Multiple Networks
For one of my experiments I had to connect my RPi to two networks at the same time. How do you do that? After all my RPi only has one Ethernet connector. One way of doing that is by adding a USB Ethernet adapter to create a second network. Case closed.
Wait a minute, both networks live as separate VLANs on my managed switch.
Isn't it possible to connect to both VLANs at the same time?
The switch can do that easily, the question is: "Can the Raspberry Pi do that too?".

The answer is a big YES.
And while we're at it, there is virtually no limit to the maximum number of VLANs your RPi can connect to over its single Ethernet port.
(Not entirely true, you can have "only" 4095 different VLANs on one Switch.)
Tagging Versus Untagging
Allow me to explain how VLAN tagging on a IEEE 802.1q compatible network works.
You can skip this chapter if you already know or don't want to know.
After all, you don't have to know how it works, as long as your Ethernet Switch and your Raspberry Pi know how to.
First of all you'll need to have a managed Ethernet Switch for this to work.
None of the standard consumer Switches I know are managed and won't be able to do the tricks we're after on this page.
Normally all Ethernet ports on a managed Switch are Untagged.
This means that all packets sent and received by the Switch are unchanged.
In this configuration each Ethernet port will carry the signals from one single VLAN only.
A broadcast packet sent on e.g. VLAN 2 will only output from the Ethernet ports which are untagged to VLAN 2.
This way all VLANs are isolated from one another.
If you want a computer to connect to multiple VLANs at a same time, you'll need multiple network cards.
Each card is connected to a separate Ethernet port on the Switch, each one belonging to one of the VLANs you're interested in.
The software in the managed Ethernet Switch will prevent a port to be untagged to more than one VLAN at the same time.
If you untag a port on VLAN 2, it will automatically disconnect from the VLAN it was untagged to previously.
Tagged ports on the other hand modify packets sent from it and expect received packets to be modified too.
Four bytes are added to the beginning of each packet sent or received.
These four extra bytes are the tag (or label), carrying the VLAN number the packet belongs to.
Tagged packets are no longer compatible with normal network connections, because they don't know what to do with these 4 extra bytes.
Things get even worse if the network connection can't cope with packets containing more than 1500 bytes (maximum MTU for an Ethernet package).
Tagged packets can contain 1504 bytes, as long as the network card allows it.
Most modern network cards do.
This way data from multiple VLANs can be transported through one single Ethernet port on your managed Switch.
It's up to the other side to de-multiplex the data to the individual VLANs again.
One of the advantage of VLAN tagging is that less physical Ethernet ports and data cables are needed to connect a device to multiple VLANs simultaneously.
Another advantage is that the network configuration is very flexible.
You don't have to add physical network cards to your computer.
The only thing you'll have to do is change some configuration files to add or delete as many virtual network adapters as you like.
The disadvantage is that all VLANs will have to share the bandwidth of one single network interface.
VLAN Tagging On Your Switch
Most modern managed Ethernet switches can handle VLAN tagging.
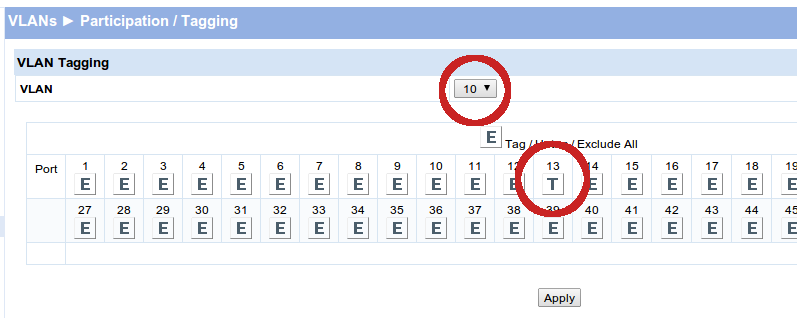
All you need to do on the Switch side is enable tagging of the selected port to all the VLANs you want to connect to your RPi.
How to do that differs from Switch to Switch.
On my HP switch it's only a matter of ticking some boxes in the VLANs - Participation / Tagging menu.
There you select a T for each VLAN you want to connect to the selected Ethernet port.
And don't forget to click Apply for each VLAN.

Normally an output port of the Switch is Untagged. This means that none of the packets sent or received through this port are modified by the Switch. This also implies that the packets can belong to only one VLAN. Untagging a particular output port to a different VLAN will disable the port on the VLAN it previously belonged to.
If you set an output port of the Switch to Tagged to VLAN X, all packets belonging to VLAN X will be transmitted or received through the select port as well, all packets will carry the VLAN number.
You'll have to tag the same Ethernet port to more than one VLAN, otherwise it will not make much sense to tag a port.
You can even leave one VLAN untagged to that port.
In mixed mode you can have one Untagged VLAN connected to a port and one or more Tagged VLANs connected to the same port.
In this mixed mode a normal computer will only be able to communicate with the untagged VLAN.
All tagged packets will be ignored by a physicial network adapter.
And a physical network adapter will never send out tagged packets, only virtual network VLAN adapters can do that.
A computer can only connect to the Tagged VLANs if it is set up properly using IEEE 802.1q virtual VLAN network adapters.
Tagging a port implies that the connected computer (or other network device) has to be IEEE 802.1q compliant.
Otherwise it won't understand the modified packets.
Normal computers won't be able to connect to such a Switch port, without appropriate settings.
I'll cover the RPi settings to make it IEEE 802.1q compliant next.
VLAN Tagging On Your Raspberry Pi
Please note that this is an updated version for Raspbian Stretch. The procedure to add virtual network cards has been changed quite significantly since Raspbian Jessie and Stretch. For whatever reason I couldn't get IPv6 to work with the old procedure anymore. And I always got an extra dynamic IP address, together with a fixed address on the physical interface. This wasn't so much of a problem, it was just a bit messy.
To make your RPi IEEE 802.1q compliant you'll have to install the vlan package first. This can be done by the next command:
sudo apt-get install vlan
After that you'll have to edit the file /etc/network/interfaces. Make sure it will look something like the listing below, which is the default content on a recent Raspbian installation. Especially the line containing source-directory is important!
# interfaces(5) file used by ifup(8) and ifdown(8)
# Include files from /etc/network/interfaces.d:

source /etc/network/interfaces.d/*
Then create a file, called vlans in the directory /etc/network/interfaces.d with the contents similar like this:"
auto eth0.10
iface eth0.10 inet manual
  vlan-raw-device eth0
This adds a virtual network card eth0.10 to your computer. You can add as many virtual network cards as you want here.
If you're satisfied with dynamically assigned IP addresses you're good to go now.
Simply reboot your machine, or restart the networking service.
If you want to assign a fixed IP addresses to your network cards you need to change some settings in the file /etc/network/interfaces before restarting the Pi or the networking service.
Make it look like the code below.
Needless to say that you'll have to set the IP address to the one you want.
And, of course, you need to add similar entries for all the VLANs you want to create.
# interfaces(5) file used by ifup(8) and ifdown(8)
# Include files from /etc/network/interfaces.d:

auto eth0.10
iface eth0.10 inet static
    address 10.0.10.16/24

source /etc/network/interfaces.d/*
It is important to have only one static router defined, no matter how many virtual networks your are defining.
Now you can restart the Pi or the networking service and you should have a machine with multiple network cards. This can be checked with the following command:
hostname -I
192.168.10.16 10.0.10.16
 Allow me to explain how VLAN tagging on a IEEE 802.1q compatible network works.
You can skip this chapter if you already know or don't want to know.
After all, you don't have to know how it works, as long as your Ethernet Switch and your Raspberry Pi know how to.
