Temperature Measurements
When you're backing a raspberry pie it is very important to keep a close eye on the temperature. This page explains some ways to measure the temperature with your Raspberry Pi. It won't show all possibilities though. I will stick to the easiest ways, reading directly from digital sensors, so we don't have to worry about Analog to Digital conversion or calibrating the sensors.
Core Temperature
By far the easiest temperature to measure is the internal CPU core temperature. We don't need any extra hardware to do this. Simply enter the next command and you'll get the current temperature of the ARM processor itself:
vcgencmd measure_temp
The temperature is shown in a nicely human readable way in degrees Celsius, like this:
temp=40.1'C
The harder you put Raspberry Pi to work, the warmer it gets. With this command you can see how warm.
1-Wire Thermometers
Dallas Semiconductors, now part of Maxim Integrated, has some very nice thermometer chips in their DS1820 series. The unique property of these thermometers is that they are digitally interfaced through only one single data wire. You can even place multiple sensors (not only thermometers) on one and the same wire if you wish.
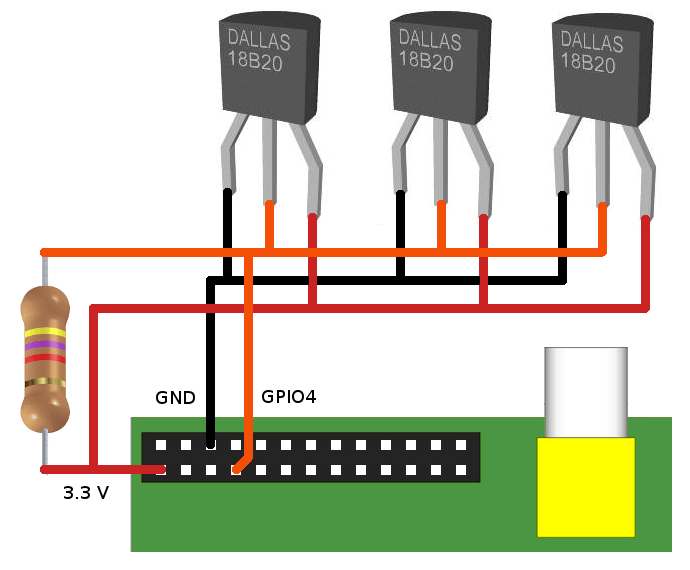
In the diagram below you see how to connect one or more thermometers to the Raspberry Pi.
All you need extra is a resistor of roughly 4k7.
You have the choice of using a DS1820, a DS18B20 (which is more accurate), or a DS18S20 (which is slower).
If you need to buy a sensor, go for the DS18B20.

Warning: Don't use the DS18x20-P versions! The P stands for Parasitic Power Only, which means that the Vcc pin is not connected. Therefore the thermometer requires a strong pull-up system during temperature conversion. And since the Raspberry Pi module does not provide for this, the temperature we'll read will always show t=85000, no matter what the real temperature is.
Using the 1-Wire thermometers has been made very simple on the Raspberry Pi.
All you need to do is make sure 2 kernel modules are loaded and then you can read a special file to get the temperature.
Here we go.
Type sudo nano /etc/modules and add the following lines at the end of the file:
w1-gpio
w1-therm
The first line enables the 1-wire protocol module. The second line loads the module which actually reads temperatures from this 1-wire bus.
Ever since Linux kernel 3.18 came out for Raspbian, which apparently was necessary for the Raspberry 2, we need to configure the so called device tree as well.
Why they haven't bothered putting that into the raspi-config script is beyond me, but maybe they will in the near future.
Until then we'll have to do this ourselves.
Enter the command sudo nano /boot/config.txt and add the following two lines to the end of the file.
# device tree config
dtoverlay=w1-gpio,gpiopin=4
After that you'll have to reboot your Raspberry Pi.
Reading the current temperature is now only a matter of reading a special file.
This file can be found in the directory /sys/bus/w1/devices.
This directory contains one or more sub directories.
The one which is always present is called w1_bus_master1.
But we're not interested in that one.
We are interested in the directories which look like 10-000800575c8b.
There should be one of these for each sensor you have connected to the 1-wire bus.
It may take a couple of seconds before they are all present.
The name of the directory is the same as the sensor's unique serial number.
If you have more than one sensor connected to the bus you will have to find out which one is which, because there is no way you can tell from the outside.
You may do that by warming up one of the sensors at a time and see which one increases.
Or you may connect the sensors one at the time and remember which one was new to the list in the above mentioned directory.
Now to read the temperature you can do (replace serial number with your serial number of course):
cat 10-000800575c8b/w1_slave
And you will see something like this:
30 00 4b 46 ff ff 0f 10 b8 : crc=b8 YES
30 00 4b 46 ff ff 0f 10 b8 t=23812
The hexadecimal numbers represent the raw byte information the sensor has returned to your RPi.
The first line verifies if the CRC checksum is correct (last byte of the answer should be the same as the calculated CRC).
If it is OK the answer YES is printed, if not the answer is NO .
If the answer is NO you'll have to read the file again, because the temperature will not be valid on this sample.
The second line holds the actual temperature in degrees Celsius (also known as centigrade), multiplied by 1000.
So you'll have to divide the value by 1000 to make it human readable.
Below is a sample scripts which reads and interprets all sensors on the bus.
#! /bin/bash

# This script reads the temperature from all connected 1-wire temperature
# sensors of the DS1820 family.
# The script will answer nothing if it can't find any sensors.
#
# Author: San Bergmans
#         www.sbprojects.net

W1DIR="/sys/bus/w1/devices"

# Exit if 1-wire directory does not exist
if [ ! -d $W1DIR ]
then
    echo "Can't find 1-wire device directory"
    exit 1
fi

# Get a list of all devices
DEVICES=$(ls $W1DIR)

# Loop through all devices
for DEVICE in $DEVICES
do
    # Ignore the bus master device
    if [ $DEVICE != "w1_bus_master1" ]
    then
        # Get an answer from this device
        ANSWER=$(cat $W1DIR/$DEVICE/w1_slave)

        # See if device really answered
        # When a previously existing device is removed it will
        # read 00 00 00 00 00 00 00 00 00, which results in a
        # valid CRC. That's why we need this extra test.
        echo -e "$ANSWER" | grep -q "00 00 00 00 00 00 00 00 00"

        if [ $? -ne 0 ]
        then
            # The temperature is only valid if the CRC matches
            echo -e "$ANSWER" | grep -q "YES"
            if [ $? -eq 0 ]
            then
                # Isolate the temperature from the second line
                TEMPERATURE=$(echo -e "$ANSWER" | grep "t=" | cut -f 2 -d "=")
                # Isolate sign, integer and fraction parts so we know where
                # the decimal point should go

                SIGN=${TEMPERATURE:0:1}
                if [ $SIGN != "-" ]
                then
                    SIGN=""
                else
                    TEMPERATURE=${TEMPERATURE:1:6}
                fi

                TEMPERATURE="000000$TEMPERATURE"
                TEMPERATURE=${TEMPERATURE:(-6)}

                INTEGER=${TEMPERATURE:0:(-3)}
                INTEGER=$((10#$INTEGER))
                FRACTION=${TEMPERATURE:(-3)}

                # Write result of this sensor
                echo "$DEVICE=$SIGN$INTEGER.$FRACTION"
            else
                # A CRC was found, show error message instead
                echo "$DEVICE=CRC error"
            fi
        fi
    fi
done
You can have quite a number of sensors on one bus.
The maximum is determined by the drive capacity of the Raspberry Pi's GPIO pin and the total capacitance seen on the line.
Keep in mind though that a single conversion time of the DS18B20 takes about 500 ms.
So if you have 10 sensors on the bus, it will take some 5 seconds for this script to run before it has got all the answers.
It appeared that at first I fell for a common programming trap, as rightfully pointed out by Petr Koutecky.
My first script failed when the temperature reached 0, in which case the sensor returns a single digit with the value of 0.
The script above is now corrected and tested against all possible values which can be returned by the sensors.
I2C Thermometers
This chapter will be filled once I've got myself an I2C temperature sensor.
 When you're backing a raspberry pie it is very important to keep a close eye on the temperature.
This page explains some ways to measure the temperature with your Raspberry Pi.
It won't show all possibilities though.
I will stick to the easiest ways, reading directly from digital sensors, so we don't have to worry about Analog to Digital conversion or calibrating the sensors.
