SSH With Two-Factor Authentication
Exposing a server to the internet might be pretty scary.
You would like to limit the number of exposed services to a minimum.
Probably the most powerful service on any Linux machine would be the ssh server.
With it you can control the computer and let it perform literally any task.
If you want to be able to control your Raspberry Pi, or just about any other Linux based computer, from any place on the internet you may want to guard yourself against unauthorized access.
The ssh service is pretty secure by itself.
However there are a couple of things you can do to make it even more secure.
Some, but most likely not all of them, are:
- Use long secure passwords for all user accounts on the machine. This is most important. If you are running an exposed ssh server you are bound to experience dictionary password attacks. So make sure your passwords don't appear in any dictionary. And don't make them too easy. Don't think nobody has ever thought of a password like "toor" or "r00t" for the root user! Passwords like these are among the first ones to be tried on your machine.
- Disable ssh access for the user root. User root is an account which appears on all Linux machines. So an attacker doesn't have to guess the user name for root, which gives him an advantage. Even if you do disable login for root, you can still gain root privileges after login yourself.
- Set up a rate limiting firewall rule. Basically you would limit the number of login attempts per minute. Any IP address which issues more connections per minute will be blocked for some time.
- Limit the number of source IP addresses from which you would normally login to your ssh machine. However this would limit your own freedom to login from any location.
- Per default ssh listens to port 22. No wonder most script kiddies will try to break in on that port number. So if you move away from port 22, you will be a lot safer, without limiting your own freedom.
- Disable password authentication. This may sound dangerous, but it is considered more secure than password login. It requires a private/public key pair to be able to login. Without this key pair there is no way you can log in to your machine.
- Set up a port knocking system. With port knocking ssh access will be blocked for all source IP addresses at first. Access from your current location will only be granted if you "knock" on a preset series of ports in the right order to temporarily open the firewall from that location.
- Add Two-Factor authentication.
There are probably many more ways to secure your ssh server against attacks. You can even make a combination of most of the above safety precautions. On this page however I'm going to limit myself to the last point, Two-factor authentication. Just because it's a reasonably recent and a relatively easy way to install adequate protection, provided by none other than Google.
Setting Up Two-Factor Authentication
Setting up Two-Factor Authentication is relatively simple.
But before you set it up, make sure you've got a contingency plan, in case you lock yourself out when something goes wrong.
The best way is to be able to login to the machine locally.
Local accounts are not affected by the Two-factor authentication.
If you can't login locally, be sure to keep the current ssh session alive until you have tried to login on a second connection to the modified setup.
You may do all this while logged in to a terminal session, either locally or remotely over ssh.
First of all install the Two-factor Authentication package:
sudo apt-get install libpam-google-authenticator
Then start the Google authenticator program on your Raspberry Pi (or just about any other Linux machine).
google-authenticator
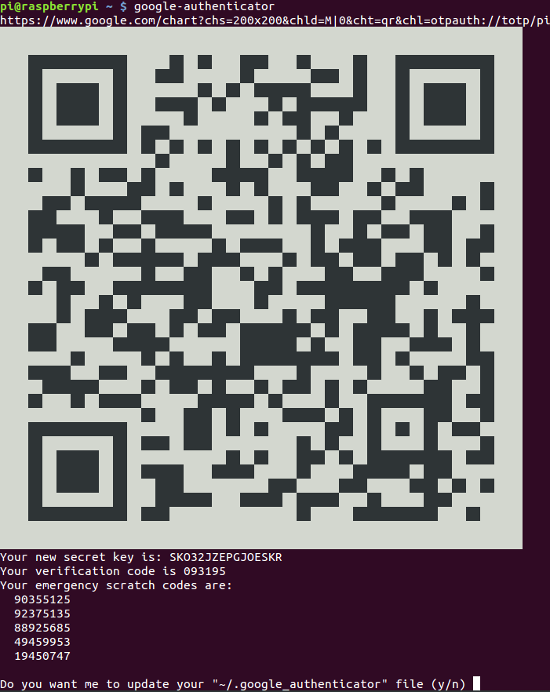
The output of this program looks something like this:

Obviously you may have to increase the size of your terminal screen to display the QR code completely. Now you should press Y for Yes and the codes are stored.
The next 3 self explaining questions asked by the program can all be answered with Yes, this will give you the best security.
Please note that the above screen shot shows you 5 emergency scratch codes.
With these codes yo can still login when you have no access to your phone.
Each of these codes can only be used once.
These codes are stored in the file .google_authenticator in your home directory.
Each time a code is used, it is removed from this file until all codes are used up.
The debian repository may hold an older version of the Google authenticator, with which you can not generate new codes.
You may simply run google-authenticator again, which will generate new codes for you.
This will also generate a new secret key though.
So you'll have to delete the old key from your Google Authenticator App on your phone and re-enter the new key again.
Install Google Authenticator App
 The next step is to install the Google Authenticator App on your mobile device.
Simply go to the Google Play store and search for Google Authenticator.
There's also an iOS app and even a Blackberry app, if they still exist by the time you read this.
Fire-up the Google Authenticator App once it is installed and add an account.
The easiest way is to scan the QR code (an option for that is provided when you want to setup a new account).
In case you don't have a bar code scanning App on your device you are prompted to install one.
Simply accept the one which is proposed to you.
You can also setup an account by typing in everything manually.
All you need is a name for the account (any name will do) and the secret key, provided by the Google Authenticator program on your Raspberry Pi.
Select Time based, then press ADD.
You can have multiple accounts on your Google Authenticator App. And while you're at it I advise you to set up Two-FactorStep Authentication for your Google account too. It works the same for both.
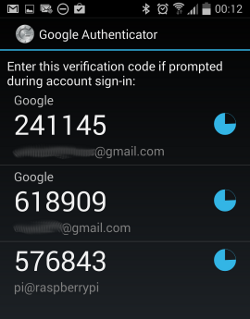
The App will show you the code you need to enter as the second authentication step on your Raspberry Pi.
The little pie shaped clock to the right of the code indicates the time during which that code is valid.
Once the time runs out, the code is discarded and replaced by a new one.
Therefore it is absolutely vital that you setup the time on your Raspberry Pi and your mobile device properly.
This basically means that you'll have to use network time synchronization, which is the default on your Pi and on most phones.
Finalize The Setup
Before Google Authenticator does anything at all you'll have to change some more settings.
Add a line at the beginning or the end of the file /etc/pam.d/sshd with the text auth required pam_google_authenticator.so.
It was common practice to put the line at the end, which causes your Pi to ask for your password first, and then for the 2FA code.
Theoretically this will allow brute force attacs on your password, before being asked for the 2FA code (if your password is easy enough to be guessed).
Putting the line in the beginning of the file makes your Pi ask for the 2FA code first, making a brute force attack on your password virtually impossible.
In the file /etc/ssh/sshd_config locate the line containing ChallengeResponseAuthentication. This option is set to no by default, change it to yes.
Finally restart the ssh server by typing:
sudo systemctl restart ssh
Check Before You Disconnect!
Don't disconnect from your terminal yet! Check, with a second terminal, whether the new setup actually works. If it doesn't you'll still have the chance to fix it with your already existing terminal.
If you do lock yourself out you can always still login directly using the console. However that will be rather difficult on a remote machine.
Limitations
Security often comes with some inconveniences.
It's not different this time.
Normally Nautilus, Nemo and Gigolo (and probably a dozen other file browsing utilities) running on another Linux machine can no longer use ssh to mount your Raspberry Pi file system anymore.
This is because these programs are usually not aware of the extra password which is required.
You can still mount your Rpi's file system on another Linux machine using sshfs though.
Fortunately passwordless connections using pre-shared keys is still possible.
